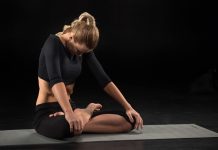
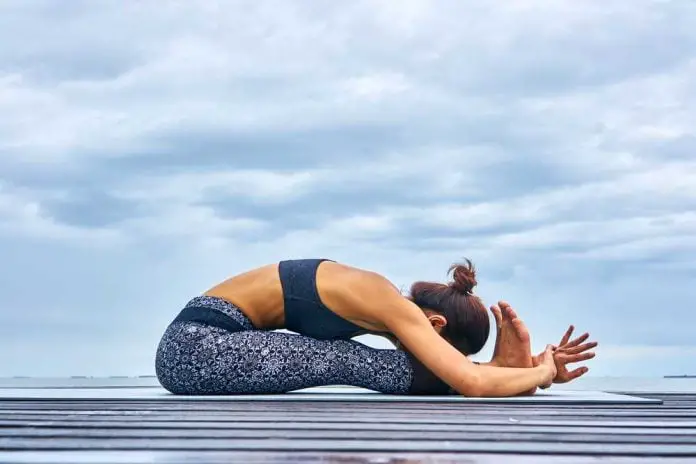
Paschimottanasana will help our backs become more flexible and without pain and without tension when we work at the table or spend a lot of time sitting. In addition, the lack of physical exercise makes the body more rigid and limits its mobility.
It’s time to incorporate yoga into your daily practice if your back feels stiff and unyielding.
The huge variety of asanas found in you can help your body get rid of this problem. The posture of sitting forward, also known as Paschimottanasana, is one of them. In this post, you will learn everything you need to know about Paschimottanasan. So let’s get started.
| Sanskrit Pronunciation | Pas-chim-ottanah-sana(Paschimottanasana) |
| Meaning | Paschim – West or the back of the body Uttana – Intense stretch Asana – Pose |
| Known as | Seated Forward Bend Pose, Paschimottanasana, West Stretch Pose |
| Pose Type | Sitting, Forward Bend |
| Pose Level | Beginner, Hold for 30 seconds to 2 minutes |
| Beneficial In | Stretching Spine, Thighs & Arms |
Seated Forward Bend Pose: Paschimottanasana
Paschimottanasana is a challenging backbend pose that extends the entire back region of your body, starting at the waist. Your entire body feels less stressed, and your mind is more at ease.
This pose will stretch and relax your entire body when you are feeling fatigued and worn out. Additionally, if your mind is restless, do this asana and you’ll notice a profoundly calming influence on it.
It mainly stretches the following parts of the body.
- Back and core
- Arms and shoulders
- Hips and thighs
- Calves and hamstrings
Hatha Yoga Pradipika Describes Paschimottanasana
The Hatha Yoga Pradipika, which dates back to the 15th century, is where the ancient yoga pose was first recorded. According to Hatha Yoga Pradipika’s Chapter 1 Verse 30,
Having stretched the feet on the ground, like a stick, and having grasped the toes of both feet with both hands, when one sits with his forehead resting on the thighs, it is called Paśchima Tâna (Paschimottasana).
This verse has sufficient information to describe Paschimottanasana/Sitting Forward Bending Pose’s steps and instructions. Let’s look at the Paschimottanasana guidelines in more detail.
How to Perform Seated Forward Bend Pose
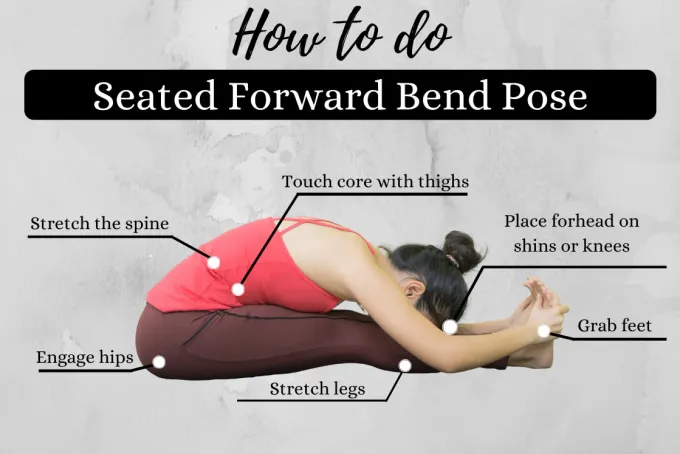
The stretching posture known as Paschimottanasana is simple and easy to do. The steps to doing this asana are as follows.
Preparing the Asana
- First, keep your spine straight and stretched out by sitting firmly on your sitting bones.
- Keep your legs straight and level on the ground as you extend them out in front of you. The feet should be grouped together with the toes facing upward.
- Put your palms firmly on the ground on either side of your hips.
- This is the Dandasana or Staff Pose. here, take a few deep breaths.
Getting into the Asana
There are two ways to enter Paschimottanasana. Let’s examine each one in turn.
Method I
- Grab the toes with your hands as you exhale, maintaining a stretched and straight spine. Let out a couple of breaths now.
- After that, touch the forehead to the knees while extending the trunk forward and bending the elbows.
Method II
- Raise your arms straight over your head, palms facing one another, while you inhale.
- Exhale, then bend forward from the waist while attempting to bring your chin to your toes.
Note: Keep your arms straight and your spine stretched.
- Raise your arms straight over your head, palms facing one another, while you inhale.
- Exhale, then bend forward from the waist while attempting to bring your chin to your toes.
Note: Keep your arms straight and your spine stretched.
- Raise your arms straight over your head, palms facing one another, while you inhale.
- Exhale, then bend forward from the waist while attempting to bring your chin to your toes.
Note: Keep your arms straight and your spine stretched.
- Raise your arms straight over your head, palms facing one another, while you inhale.
- Exhale, then bend forward from the waist while attempting to bring your chin to your toes.
Note: Keep your arms straight and your spine stretched.
- Put your hands on your toes and, if you can, rest your forehead on your shins or knees.
The next step is the same for both approaches after this.
Note: Touch the belly to the thighs and strive to lengthen the spine as much as you can. If your knees are just a little bit off the ground, do not worry. It is entirely typical.
Paschimottanasana is divided into three categories based on the hand position on the toes: Paschimottanasana A, Paschimottanasana B, and Paschimottanasana C. Let’s examine each one in turn.
-
1. Paschimottanasana A
You must hold your left and right big toes with the first two fingers of your respective hands in Paschimottasana A. In this position, you must flex your elbows and rest them on the ground. After that, touch your knees with your forehead.
-
2. Paschimottanasana B
You grasp the soles of the feet in Paschimottanasana B with the appropriate hand, either from the sides of the feet or over the toes. Put your forehead on your knees after that.
-
3. Paschimottanasana C
In Paschimottanasana C, you need to reach beyond the extended feet and grip the right hand’s wrist or palm with the left hand (or vice versa). Next, lay your forehead against your thighs or shins.
These three categories are challenging in escalating order. Start with assuming Paschimottanasana A. Go for it when you feel comfortable.
- B. Paschimottanasana Then, when you begin to feel comfortable, move on to Paschimottanasana C.
Breathe deeply and focus on the prana flow after falling into one of these groups.
Releasing the Asana
- After finishing, inhale slowly and deeply. Once you’ve taken a breath, release your hands from the table and sit down.
- After that, let out a breath and let your body relax, dropping your arms.
Beginner’s tips
- You might not be able to place your forehead on your knees and touch your hands with your toes at first. Therefore, don’t worry about it since it is common at first. Simply extend as much as you can while maintaining a straight spine.
Also, if you are unable to touch your toes, gently rest your arms on your shins or above your ankles while stretching your back.
- Beginners might ask their partner or teacher to push their backs so that they can stretch their backs more.
- To increase comfort, place a folded blanket under your hips.
- If a beginner is unable to stretch their body forward, they can utilize a yoga strap. Simply wrap the strap around the feet and hold it in place. After that, pull it to extend your back.
- Perform it for brief intervals at first, such as 30 to 60 seconds, and then progressively lengthen it.
Precautions and Contraindications
- Do not bend beyond what your body is capable of. Your body should be stretched and bent to the best of your ability. You risk injury if you stretch too far.
- Since it is a forward bend, your stomach must be engaged. Therefore, only perform it on an empty stomach.
- Paschimottanasana should not be done if you have a sliding disc, spondylitis, or a hernia.
- This pose should not be done by pregnant women since it exerts pressure on the pelvis and part of the abdomen. It is detrimental to the fetus’s health.
- Do not execute this asana if you have a recent or severe injury to your knees, thighs, arms, spine, or shoulders.
Paschimottanasana for Increasing the Height
Paschimottanasana is a fantastic exercise choice if you’re seeking something that might help you get taller. By the age of 21, you can easily grow your height, and in many cases, height continues to rise even after this age.
In general, posture and height go hand in hand, and yoga asanas are all about posture. This asana’s body posture stretches all the muscles that primarily affect your height, including your spine, legs, and calves.
In this pose, your spinal columns are growing as you stretch your body. Additionally, you are stretching the thigh and calf muscles in the lower body. The muscles in these places become longer and stronger as a result of this strain.
As a result, this pose gradually raises your height.
Benefits of Seated Foreward Bend Pose
Your entire body will be stretched out and become more flexible with this asana. It gives the body a beautiful shape and posture.
According to Hatha Yoga Pradipika’s Chapter 1 Verse 31,
The benefits of Paschimottanasana can be understood from one verse alone. In the list that follows, let’s talk about them in more detail.
- All the muscles surrounding the spine are stretched, and the spinal columns’ blood flow is improved. As a result, it keeps the spine strong, flexible, and healthy.
Additionally, it makes the back more mobile and eliminates all of its stiffness.
- The pose is known as Paschimottanasana stretches the abdominal muscles. It promotes the operation of internal organs such as the pancreas, intestines, liver, kidneys, and endocrine glands by massaging them. As a result, the metabolism and digestive system both benefit.
Patients with diabetes and those who have weak kidneys or livers will benefit most from this.
- It also worked and exercised the muscles in the abdomen. Thus, the abdominal area’s extra fat is removed.
The muscles in the pelvis are massaged and toned by this pose. The reproductive organs remain healthy as a result.
- This pose also supports women during menopause and their menstrual cycles.
- Foreward Bend seated The muscles in the hips, hamstrings, thighs, and legs are stretched during the pose. The muscles in these places are toned by this stretching. Additionally, this pose gives the leg a nice overall shape.
- It helps to increase the flexibility and mobility of the shoulders and arms by stretching the muscles in those areas.
- More oxygen reaches the brain thanks to this asana. This enhances mood, supports brain function generally, and eliminates negative emotions like rage, melancholy, tension, etc.
- Foreward Bend seated The muscles in the hips, hamstrings, thighs, and legs are stretched during the pose. The muscles in these places are toned by this stretching. Additionally, this pose gives the leg a nice overall shape.
- Also, it calms the mind and removes its restlessness.
To Sum Up
The name Paschimottanasana translates to “basic stance of yoga” in Sanskrit. In order to stretch the hamstrings and back muscles, the upper body is folded forward over the legs in this position. It releases tension from your body, increases flexibility, targets abdominal fat, and generally aids in relaxation and healing. You absolutely must include this pose in your current yoga routine. If you haven’t tried various yoga poses yet, do so right away to start enjoying the rewards!

