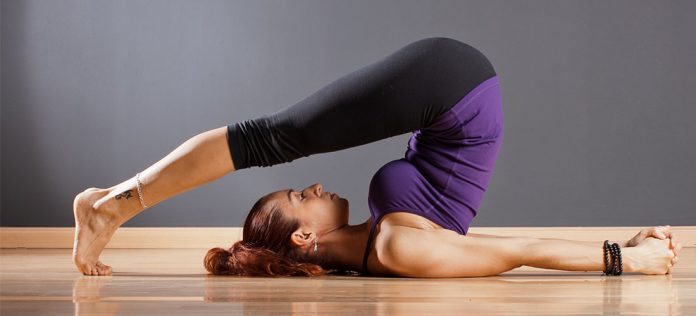
The fourth pose, known as Plow Pose or Halasana, gets its name from the position your body takes. It has the appearance of a plow, a common farming implement used in Indian agriculture. In addition, the word Hal, as its name suggests, is Sanskrit meaning plow.
The Plow Pose is a moderate inversion and stretching posture for intermediate practitioners. It primarily stretches the spine and gives the entire body flexibility. Additionally, it strengthens the neck, core, hip, and hamstring muscles.
As a result, it also gets rid of lethargy, exhaustion, and laziness while maintaining your energy.
BKS Iyenger claims that Halasana is a continuation of Sarvangasana (shoulder stand).
It boosts your brain function, memory, and cognition and increases blood flow to your head. It is a great pose for mind and body opening.
The Halasana pose in yoga makes you bend and curl like a pretzel.
Halasana: instructions, benefits, and harms however, despite its many benefits, such as extending the spine and calming the mind, some practitioners and teachers elect to skip it due to the strain it exerts on your cervical spine and neck.
However, once you begin doing this pose, you’ll discover that its advantages far outweigh its difficult posture.
Let’s examine how to properly do this asana and the advantages you will experience.
Practice Guide to Plow Pose
Preparatory Poses
- Salamba Sarvangasana (Supported Shoulderstand)
- Bridge Pose (Setu Bandha Sarvangasana)
- Navasana (Boat Pose)
How to Do Plow Pose(Halasana)
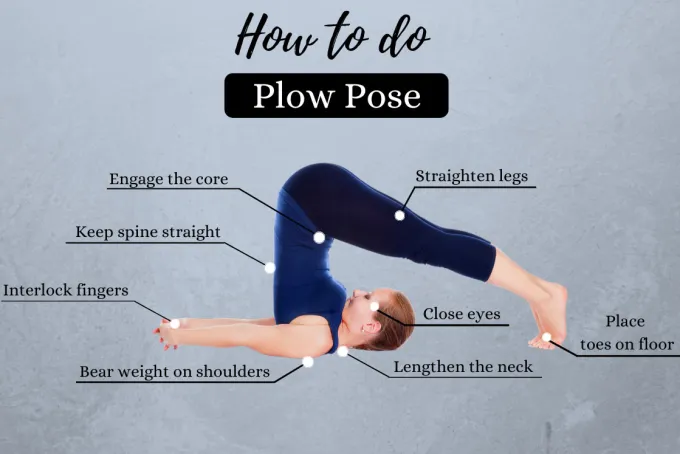
- On your yoga mat, lie flat on your back. With your hands facing down, position your arms next to your torso.
- Take a deep breath in and elevate your legs with your abdominals. To make a 90-degree angle with the floor, raise the legs.
- Exhale while bending your knees, moving your forehead nearer to your knees or legs, and bringing your hands to your toes. Feel the stretch in your shoulders and neck.
- After a few long breaths, elevate your legs higher, drop your head, and slowly relax your neck until your lower back is raised off the floor.
- Deeply inhale, then bring your feet behind your head so that your toes are on the floor. Your hips will lift off the mat as a result, and your back will become perpendicular to the floor.
- Legs should be extended and kept straight as you move them slowly and gently.
- To keep your legs in place, briefly hold onto the backs of your thighs.
Straighten your arms and interlace your fingers behind your back after you are certain that your legs are in the correct position. - You can either close your eyes or fix your attention on your nose. At no time while performing this stance, make sure you are holding your breath.
- At first, maintain this position for at least 10 to 15 seconds, or as long as you can. Increase the holding period gradually.
- When finished, let go of your hands and raise them up to support the lower back.
- Swing your hands to the backs of your legs as you inhale and lower your hips. As you complete your exhale, pull them to a 90-degree angle and then slowly lower them to the mat.
- Relax by spreading your arms and legs.
Tips for beginners in the Halasana pose
- You should practice this difficult pose under the cautious supervision of a qualified yoga teacher first because it puts pressure on your neck and shoulders.
- When beginning this position, clench your shoulder blades together to push yourself up onto the tops of your shoulders. Extend your shoulder blades across your back to widen your sternum once you are in the position.
- Try to put your weight on your upper shoulders rather than your neck and head. Use your shoulder and arm muscles instead of your neck to prevent unnecessary strain.
- Tucking your chin in will help you exert a little pressure on your chest.
- For added comfort and support, place a folded blanket beneath your head, shoulder, and neck. You are welcome to seek assistance from a friend or teacher to perform this asana.
Precautions
- Don’t assume the position hastily. Without missing a beat, carry it out slowly and carefully.
- Avoid turning your head or looking around while executing Plow Pose because doing so could injure your neck.
- Avoid pushing your body to stretch. Recognize your body’s limitations and extend it appropriately.
- Women who are pregnant or menstruating should avoid the Halasana pose for now
Contraindications
If you have sciatica, slipped discs, or diarrhea, avoid doing Halasana.
Do not practice this asana if you just suffered an injury or if you recently had surgery on your neck, shoulders, spine, or legs.
Plow Pose should be avoided for the time being by women who are pregnant or menstruating.
Contraindications
- If you have sciatica, slipped discs, or diarrhea, avoid doing Halasana.
- Do not practice this asana if you just suffered an injury or if you recently had surgery on your neck, shoulders, spine, or legs.
- Plow Pose should be avoided for the time being by women who are pregnant or menstruating.
- This yoga pose is not recommended for anyone with enlarged thyroid, spleen, or liver since it exerts a lot of tension on the lower abdomen.
- You shouldn’t practice this pose if your neck muscles are weak or injured.
- Proceed with caution if you suffer from asthma, high blood pressure, migraines, or headaches.
- This position is typically not advised for practitioners who have glaucoma, an eye ailment that damages the optic nerve. The pressure already placed on the optic nerve by this position may become even more acute.
- Instead of putting your toes on the floor at first, you can position a chair behind your head and stand on it. The same can be accomplished using a bolster, a cushion, or a stack of yoga blocks.
- Instead of putting your feet behind your head, you can also lean them up against the wall. Placing the soles of your feet on the wall will cause your legs to form a 90-degree angle with your hips.
Variations of the Halasana pose
- You should go on to this form of Karnapidasana (Ear Pressure Pose) once your back and hips are sufficiently flexible and your neck and shoulder are strong enough. After remaining in the plow posture’s last position, you perform the ear pressure pose by bending your knees and bringing them up close to your ears.
- Parsva Halasana, also known as the Side Plow Pose, requires you to slant your legs to the side. This is yet another advanced version, thus it should only be attempted after becoming proficient in the initial plow stance. Keep your hands on your back to support yourself. Step slowly to the right and hold the position for 30 to 60 seconds. Bring it to the middle next, then stop. After then, shift your feet to the left and hold for 30 to 60 seconds. Follow your path back to the center.
Follow-Up Poses
- Matsyasana (Fish Pose)
- Sirsasana (Headstand)
- Savasana (Corpse Pose)
- Adho Mukha Svanasana (Downward-Facing Dog Pose)
- Paschimottanasana (Seated Forward Bend Pose)
Benefits of Halasa
The body can benefit greatly from the plow stance. It enhances posture and tones all of the body’s muscles. It improves blood circulation and eases muscle tightness in the back and hips. Additionally, you might work on developing stronger core muscles to better support your spinal column.
Here are a few advantages of the Plow Pose.
- strengthens and stretches the back muscles.
- increases the blood flow to the spine, making it more flexible, toned, and supple.
- increases circulation controls blood pressure and lowers blood sugar levels to assist in managing diabetes.
- Helps to prevent and treat shoulder, neck, and back discomfort.
- Enhances joint and muscle flexibility and mobility.
- Stretching, increasing flexibility, and strengthening the cervical neck muscles nourish them.
- Improves the core by toning and strengthening the abdominal muscles.
- Reduces the pelvic and hip muscles’ accumulated stiffness and tension.
- Improved reproductive organ functionality by massage reduces painful monthly symptoms, signs of menopause in women, and infertility in males.
- Promotes increased blood flow throughout the body, which helps the body to detoxify.
Constipation, gas, and other disorders connected to digestion are improved and reduced. - Increases metabolism, which also contributes to the reduction of belly and thigh fat.
- Gives the body energy and takes away exhaustion, stress, and sluggishness.
- Increases brain function by increasing the flow of blood and oxygen to the head.
- By calming the central nervous system, calming the mind, and getting rid of unpleasant feelings like rage, depression, etc.
- It increases the flexibility of the thighs, knees, calves, and feet while stretching the muscles of the legs.
Conclusion
Be brave and try this complicated-looking position. Even if it seems challenging, practicing this pose and facing your concerns will be simpler if you follow the instructions and use the props.
Frequently Asked Questions
What are the disadvantages of the Halasa pose
Halasana is not an easy pose for beginners. The peculiar angle of this pose, which might make some individuals feel more worried, makes it difficult for many people to practice. Sometimes, just by looking at it, they are deterred from practicing this stance.
Additionally, if the shoulders are pulled too far away from the ears, the throat is compressed, which can make it difficult to swallow and result in suffocation symptoms. Additionally, you run the risk of straining your back muscles and harming your spinal column if you aren’t employing spine-supporting devices.
Does Plow Pose/Halasana reduce belly fat?
Yes, if done properly, it can help reduce abdominal fat.
When you adopt this posture, you put pressure on your midsection and stomach. Massaging the digestive system, facilitates digestion and regulates hunger. It also has an impact on the thyroid, which improves metabolism. If you practice Halasana frequently, your breath will grow more potent.
It is a great tool for aiding in fat loss because of all of these factors put together.

