


")
")


Meaning, location, and symptoms of a balanced and blocked heart chakra")


: Everything You Should Know About It")

Yoga for Shoulder Pain. Yoga offers numerous benefits such as improved strength, flexibility, and relaxation. However, it is essential to consider the specific circumstances of clients with shoulder injuries or pain before determining whether they should practice yoga.
To provide appropriate guidance, it’s crucial to understand the anatomy of the shoulder and the common causes of shoulder pain or injury. By doing so, yoga instructors can offer tailored recommendations to their clients.
Shoulder Anatomy and Function
The shoulders consist of three main muscles:
-
Anterior deltoid
-
Medial deltoid
-
Posterior deltoid
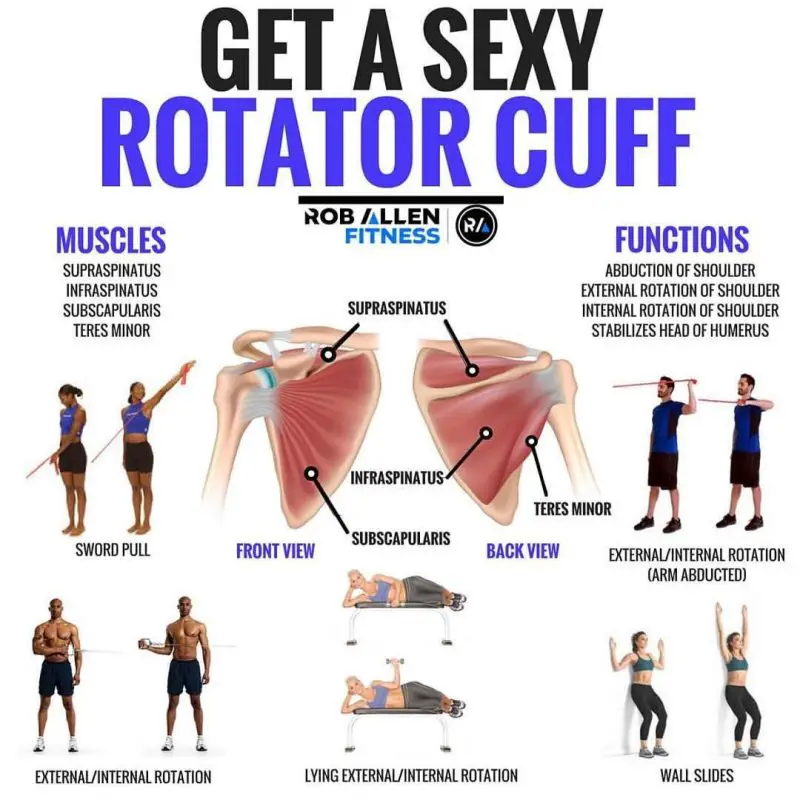
- Rotator cuff muscles: These muscles include the supraspinatus, infraspinatus, teres minor, and subscapularis. They help stabilize the shoulder joint and assist with various movements.
- Trapezius: This large muscle extends from the neck and upper spine down to the middle of the back. It helps with shoulder movement and posture.
- Rhomboids: These muscles are located between the shoulder blades and aid in scapular retraction and stability.
- Serratus anterior: Positioned on the sides of the chest, these muscles contribute to scapular protraction and stability.
- Pectoralis major and minor: These chest muscles play a role in shoulder flexion, adduction, and rotation.
It’s important to note that yoga can be modified to accommodate individuals with shoulder injuries or pain. Specific poses may need to be avoided or modified to reduce strain on the shoulders. Consulting with a qualified yoga instructor or healthcare professional can provide personalized guidance and ensure a safe practice.
-
Rotator cuff
-
Biceps and triceps in the upper arm
-
Pectoralis muscles of the chest
-
Latissimus dorsi and teres in the back
-
The musculature of the shoulder blades
-
Trapezius and rhomboids
Common Shoulder Pain Causes
These are just a few examples of how shoulder pain and injury can occur. It’s crucial to address and manage shoulder pain effectively to prevent further complications and maintain overall well-being.
If you’re experiencing shoulder pain or have a shoulder injury, it’s essential to consult with a healthcare professional for an accurate diagnosis and appropriate treatment plan. They can provide guidance on specific exercises, therapies, or interventions that may be beneficial for your condition.
If you’re experiencing shoulder pain or have a shoulder injury, it’s essential to consult with a healthcare professional for an accurate diagnosis and appropriate treatment plan. They can provide guidance on specific exercises, therapies, or interventions that may be beneficial for your condition.
Yoga can be a helpful complementary approach for shoulder rehabilitation and the prevention of future injuries. However, it’s important to approach yoga practice mindfully and with modifications to accommodate any limitations or pain in the shoulder area. Working with a knowledgeable yoga instructor who has experience with therapeutic yoga or rehabilitation can be beneficial.
Remember, each individual’s situation is unique, and personalized care is crucial for effective shoulder pain management and recovery.
In instances such as these, pain is often the result. Developing a regular yoga practice can help with pain relief. Ultimately, this provides clients with a higher quality of life.
Developing a Yoga Practice to Ease Shoulder Pain
These research findings suggest that yoga can be a beneficial practice for individuals experiencing shoulder pain. Yoga’s focus on gentle stretching, strengthening, and relaxation techniques may help alleviate muscle tension and improve overall shoulder function. It can also have positive effects on related areas such as the neck and back.
It’s important to note that when practicing yoga for shoulder pain relief, it’s crucial to listen to your body and work within your limitations. Modifications and adjustments to yoga poses may be necessary to avoid exacerbating any existing shoulder issues. Consulting with a qualified yoga instructor or therapist who specializes in therapeutic yoga can provide valuable guidance and ensure safe and effective practice.
In addition to yoga, it’s recommended to consult with a healthcare professional to determine the underlying cause of shoulder pain and explore a comprehensive treatment plan that may include physical therapy, medication, or other interventions as needed.
Overall, incorporating yoga into a holistic approach to shoulder pain management may contribute to improved well-being, reduced discomfort, and enhanced quality of life.
Indeed, yoga has shown the potential in helping individuals with shoulder pain associated with chronic illnesses, such as breast cancer. The study you mentioned highlights the positive impact of Hatha yoga on reducing shoulder pain severity in breast cancer patients.
The gentle and therapeutic nature of Hatha yoga, which focuses on breathing exercises, gentle movements, and relaxation techniques, may contribute to pain relief and improved well-being. By practicing yoga, individuals with chronic illnesses can experience physical and psychological benefits, including reduced pain levels and increased overall comfort.
It’s important to emphasize that yoga should be approached as a complementary therapy and not a substitute for medical treatment. Breast cancer patients, or anyone with a chronic illness, should always consult with their healthcare providers before starting any new exercise or yoga program. Working with a qualified yoga instructor who has experience in adapting poses and sequences for individuals with specific health concerns is also recommended to ensure safe and appropriate practice.
Incorporating yoga into a comprehensive care plan, alongside medical treatment and other supportive therapies, may contribute to better pain management, improved quality of life, and overall well-being for individuals with chronic shoulder pain related to illnesses like breast cancer.
5 Yoga Poses for Shoulder Impingement, Rotator Cuff Injuries, and Pain Reduction
Which yoga poses are best for easing bothersome shoulder pain? For patients recovering from a rotator cuff injury or struggling with pain due to tendonitis, here are a few to consider:
Mountain Pose
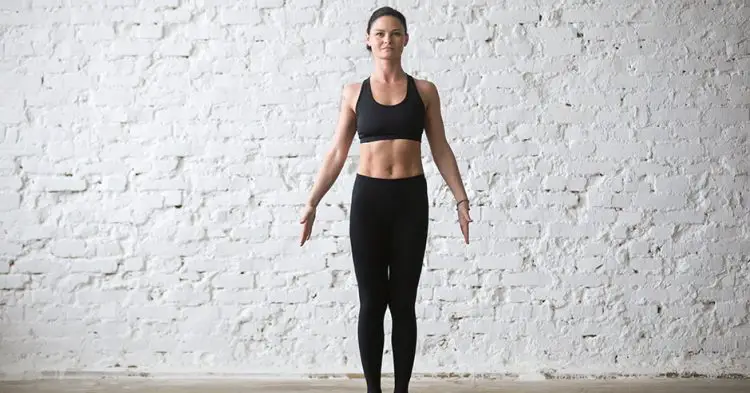
Mountain Pose (Tadasana) is a foundational yoga pose that not only strengthens the muscles in the shoulder area but also engages the serratus anterior muscle, which plays a crucial role in shoulder mobility. Here’s how to practice the Mountain Pose:
- Stand tall with your feet together, toes touching, and distribute your weight evenly on both feet.
- Keep your arms hanging naturally at your sides, palms facing forward.
- Roll your shoulders back and down, gently squeezing your shoulder blades together.
- As you do this, feel the engagement in the muscles around your shoulder blades.
- Now, separate your shoulder blades by pushing them away from each other while maintaining an open chest and lengthened spine.
- Hold this position for 30-60 seconds, breathing deeply and maintaining good posture.
During the Mountain Pose, focus on creating space and strength in the shoulder area by activating the muscles around the shoulder blades and engaging the serratus anterior. This helps improve shoulder range of motion and counteracts any issues related to reduced mobility caused by a weak or underactive serratus anterior muscle.
As with any yoga pose, it’s important to listen to your body and not push beyond your comfortable limit. If you experience any discomfort or pain, adjust or modify the pose as needed. It’s always beneficial to practice under the guidance of a qualified yoga instructor, who can provide personalized guidance and ensure proper alignment for maximum benefit and safety.
Cow Face Pose
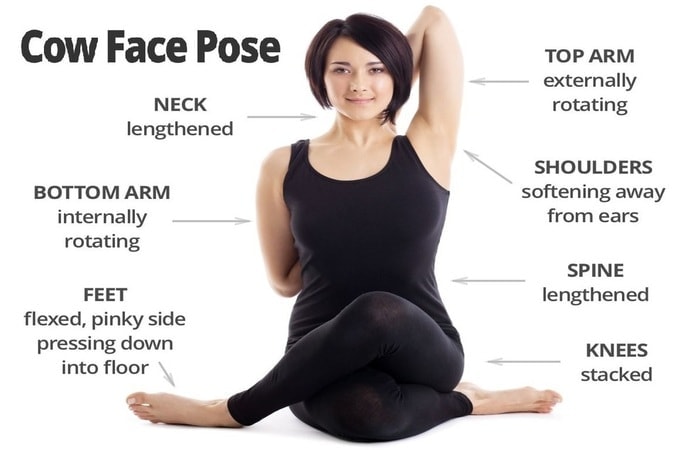
The Cow Face Pose (Gomukhasana) is a beneficial yoga pose that can help improve shoulder mobility, particularly for clients with a slightly limited range of motion. Here’s how to practice it:
- Start by sitting comfortably on the floor or on a yoga mat with your legs crossed. If sitting cross-legged is uncomfortable, you can sit on a folded blanket or bolster for support.
- Extend your right arm straight out in front of you at shoulder height.
- Bend your right elbow and reach your right hand behind your back, aiming to touch your upper back or shoulder blade.
- At the same time, extend your left arm out to the side and then reach it up toward the ceiling.
- Bend your left elbow and reach your left hand down your back, trying to connect the fingers of both hands behind your back. If your hands do not meet, you can use a strap or towel to hold on to and gradually work towards interlacing your fingers.
- Hold the pose for 30 seconds to 1 minute, breathing deeply and maintaining a comfortable stretch.
- Release the pose and repeat on the other side, switching the position of your arms.
The Cow Face Pose stretches the shoulders, chest, and arms, promoting greater flexibility and range of motion in the shoulder joints. By reaching behind your back with each arm, you are encouraging mobility and gently opening up the shoulders. If your client finds it challenging to touch their shoulder blade, they can use a strap or towel to bridge the gap between their hands, gradually working towards deeper flexibility over time.
Remember to practice this pose within your client’s comfortable range of motion, without forcing any movements or experiencing pain. It’s essential to listen to the body and modify the pose as needed. Encourage your client to practice Cow Face Pose regularly to gradually improve shoulder mobility and flexibility.
Cat Cow Pose
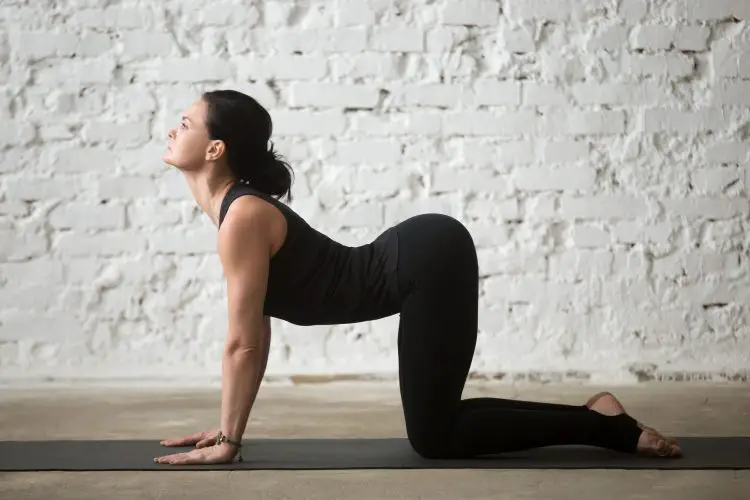
This series of movements, known as Cat-Cow Pose or Cat-Cow Stretch, is excellent for stretching and mobilizing the chest, neck, shoulders, spine, and lower back. Here’s how to perform it:
- Start by coming onto your hands and knees, with your wrists directly under your shoulders and your knees hip-width apart.
- Inhale deeply and gently arch your spine, allowing your belly to sink towards the floor. Lift your gaze towards the ceiling, creating a gentle backbend. This is the Cow Pose.
- Exhale slowly and round your spine upward like a cat, tucking your tailbone, and drawing your chin towards your chest. Let your head hang naturally. This is the Cat Pose.
- Continue flowing between Cow Pose and Cat Pose with your breath, moving smoothly and gradually. Inhale as you transition to Cow Pose and exhale as you transition to Cat Pose.
- Repeat this flowing movement for several rounds, allowing each breath to guide your movements and deepen the stretch.
During the Cow Pose, the chest opens, the shoulders roll back, and the spine extends, providing a gentle stretch to the front body. In the Cat Pose, the spine flexes, creating a stretch along the back body and releasing tension in the shoulders and neck.
Encourage your client to focus on their breath and move mindfully throughout the exercise. Remind them to listen to their body and modify their movements if needed, avoiding any discomfort or pain. Practicing the Cat-Cow Pose regularly can help improve flexibility, relieve tension, and promote a healthy range of motion in the shoulders and spine.
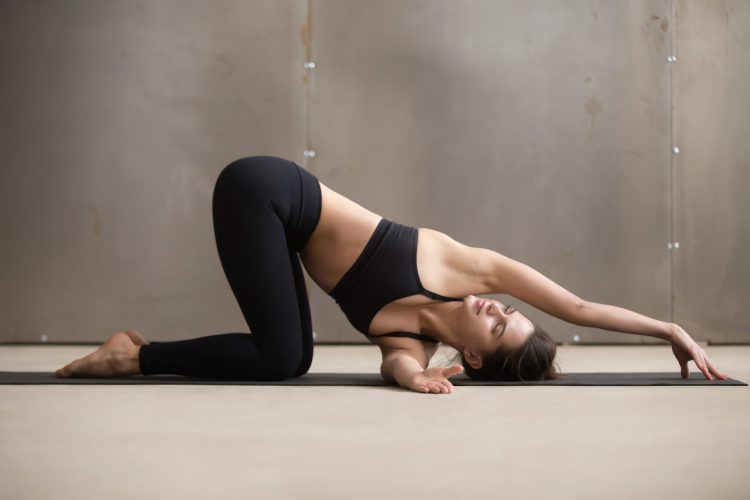
Thread the Needle Pose
These modifications are indeed helpful for clients with shoulder issues. Here’s a breakdown of the modified poses:
1. Baby Cobra: Instead of performing a full Cobra pose, which involves lifting the entire upper body off the mat, have your client do a Baby Cobra. Here’s how to do it:
- Lie on your stomach with your legs extended and the tops of your feet pressing into the mat.
- Place your hands on the mat underneath your shoulders, fingers pointing forward.
- Inhale and gently lift your chest and shoulders off the mat, keeping your lower body relaxed.
- Keep your elbows slightly bent and draw your shoulder blades together to open the chest.
- Hold this position for a few breaths, then exhale and slowly lower back down.
2. Modified Warrior II: To reduce tension on the shoulder joint and muscles, modify the Warrior II pose as follows:
- Start in a standing position with your feet about 3-4 feet apart.
- Turn your right foot out 90 degrees, aligning your right heel with the arch of your left foot.
- Instead of extending your arms in opposite directions, place your hands on your hips.
- Keep your shoulders relaxed and focus on maintaining a strong and stable lower body.
- Gaze over your right fingertips and hold this modified Warrior II pose for several breaths.
- Repeat on the other side, turning your left foot out and placing your hands on your hips.
These modifications allow your clients with shoulder issues to still experience the benefits of yoga while minimizing strain on the shoulder joint and muscles. Encourage them to listen to their bodies, take things at their own pace, and modify further if needed. As always, it’s essential to consult with a healthcare professional or a qualified yoga instructor to ensure the safety and suitability of these modifications for each individual client.
Common Ways Yoga Can Lead to Shoulder Injury
Among the reasons provided for shoulder injuries during yoga practice, as reported by the yoga teachers and therapists in the study, were:
- Overexertion: Pushing oneself too hard or attempting advanced poses without proper preparation or guidance can strain the shoulder muscles and joints.
- Incorrect alignment: Improper alignment during poses, such as placing excessive weight on the shoulders or rounding the upper back, can put unnecessary stress on the shoulder joint and lead to injury.
- Insufficient warm-up: Skipping or inadequate warm-up exercises before engaging in yoga practice can leave the shoulder muscles and joints unprepared for the movements and increase the risk of injury.
- Repetitive movements: Repeating certain poses or movements excessively, especially those that involve repetitive arm movements or weight-bearing on the shoulders, can strain the shoulder muscles and lead to overuse injuries.
- Lack of modifications: Failing to modify poses according to individual capabilities, limitations, or pre-existing shoulder conditions can increase the risk of injury, particularly for those with underlying shoulder issues.
It’s crucial for both yoga practitioners and instructors to prioritize safety and proper technique during practice. Listening to the body, honoring its limits, and seeking guidance from a qualified yoga teacher or therapist can help minimize the risk of shoulder injuries during yoga sessions.
How to Prevent Shoulder Joint Injury When Doing Yoga
To enhance shoulder stability and reduce the risk of injury during yoga practice, incorporating exercises that strengthen the rotator cuff and improve shoulder mobility is beneficial. Here are a few exercises that can be included:
- External Rotation with Resistance Band: Secure a resistance band to a stationary object at waist height. Hold the band with one hand and keep the elbow bent at 90 degrees, close to your side. Slowly rotate your forearm outward against the resistance of the band. Repeat for 10-15 repetitions on each side.
- Shoulder Rolls: Stand tall with your arms relaxed at your sides. In a smooth, controlled motion, roll your shoulders forward, then upward, backward, and downward. Repeat this movement for 10-15 repetitions, focusing on maintaining a relaxed and controlled motion.
- Thread the Needle: Start on all fours in a tabletop position. Reach your right arm under your left arm and lower your right shoulder and cheek to the ground. Hold this position for 30 seconds, feeling a gentle stretch in the shoulder and upper back. Repeat on the other side.
- Eagle Arms: Extend your arms straight in front of you at shoulder height. Cross your right arm over your left arm, bending both elbows. Bring the palms of your hands together, if possible, or press the back of your hands together. Lift your elbows to shoulder height and hold for 30 seconds. Repeat on the other side.
- Child’s Pose with Shoulder Reach: Begin in a kneeling position and sit back on your heels. Extend your arms forward, lowering your forehead to the mat. From this position, walk your hands to the right as far as you comfortably can, feeling a stretch in the left shoulder. Hold for 30 seconds, then repeat on the other side.
Remember to emphasize proper form, alignment, and breath control during these exercises. Encourage clients to listen to their bodies, modify as needed, and never push through pain or discomfort. If clients have any pre-existing shoulder conditions or concerns, it is advisable for them to consult with a healthcare professional before engaging in these exercises.
A Final Word About Yoga and Shoulder Injury
If your personal training client is concerned about the risk of injury when doing yoga—whether that injury is to the shoulder or some other area—it may help to stress that, as long as they use proper form and technique, they should be able to avoid any potential issues.
Additionally, if they have previously suffered a rotator cuff tear or injured another muscle or tendon in the shoulder, they may want to consult with their doctor before beginning yoga or any other exercise program. This helps reduce the risk of inflaming that old injury. It also lowers the likelihood that they’ll experience an increase in pain.
Their health provider may recommend that they perform corrective exercises targeted at the shoulders before beginning a yoga practice. Increasing shoulder mobility makes it easier to engage in various yoga poses without pain. It also helps heal rotator cuff tears, frozen shoulders, and shoulder impingement.
The ISSA’s Yoga Instructor certification program is a great way to learn more about yoga and the benefits it offers. This course also provides instruction about various yoga styles, from Yin Yoga to Ashtanga Yoga and more. Upon its completion, you will better understand how to perform yoga with proper form. This will help your clients reduce their injury risk and enjoy this centuries-old practice without worrying about causing pain.
Remember to always prioritize your client’s safety and well-being by providing proper guidance, modifying exercises as needed, and encouraging open communication.


